Vox Unbox
How to Make the Earth Zoom Effect with Adobe Apps
We're going to recreate the Earth zoom out and in effect, seen in the first few seconds of Vox's video "How the US outsourced border security to Mexico."

We will use After Effects to create the zoom out effect and to add additional elements like clouds and stars.

We will use Premiere to create a reverse (or zooming in) effect and to export our video.
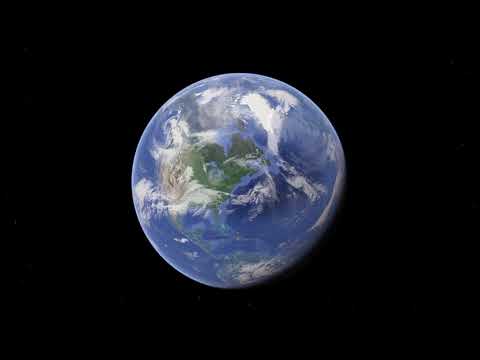
The Final Product
How to Make the Effect
Step 1. Collect 8-10 areal images of where you want to zoom out from, as seen below. Sort them with the closest one first, and the Earth shot last.
Step 2. Open a new project in After Effects and import your areal images into a new Composition (maintaining the order).
Step 3. Link the layers (i.e. images) by aligning each layer over the subsequent one. To do this, shut off all the layers except the two layers you are working with. Turn down the opacity of Layer #2 to 50% so it shows through. Then, scale down Layer #1 to align with Layer #2. Then, parent Layer #1 to Layer #2, so that when Layer #2 is scaled down, Layer #1 will scale down with it as well.

Where to find the "Title/Action Safe" tool

Where to find the "Pan Behind (Anchor Point) tool
Step 4. Repeat Step 3 for all the images, making sure that you parent each layer to the subsequent layer (Note: the last layer is not parented to any layer).
Step 5. Select all images and turn the opacity back to 100% and change the Parent to "None." Then, select all layers, except Layer #1, and parent them to Layer #1.
Step 6. Change the Scale of Layer #1 to 100,100% (Note: all the other layers have scaled up).
Step 7. With Layer #1 selected, use the "Title/Action Safe" option to position where you want to zoom from. Then, with Layer #1 still selected, use the "Pan Behind (Anchor Point) Tool" to move the anchor point of the layer over desired zoom point.
Step 8. Set the scale at 100% at minute 0:00 and add a key frame by selecting the stopwatch next to Scale indicator, as seen below. Then, drag the time indicator over to around 6 seconds, and adjust the scale to ~0.002 and add another key frame. Now, when you drag the time slider from 0:00 to 0:06, you should the layers scale down, or "zooming out."

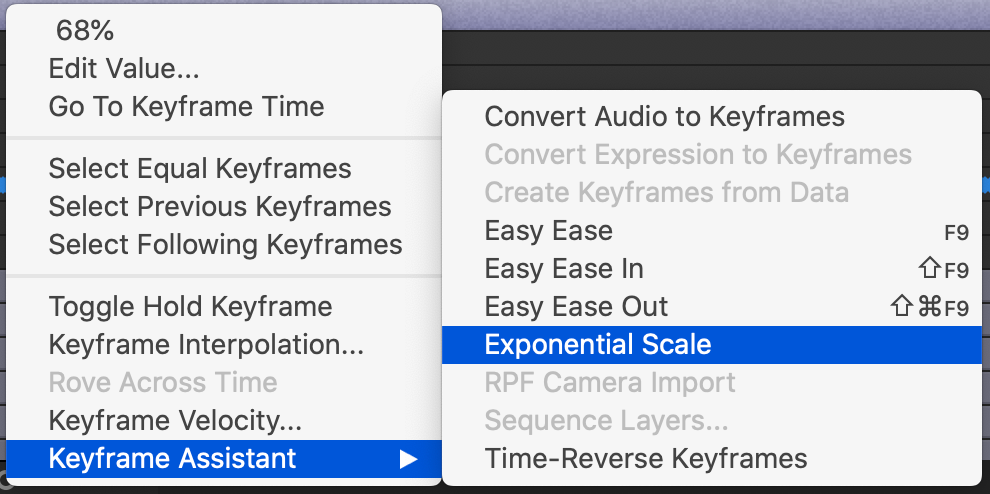
Step 9. Adjust the speed at with the zoom out occurs by selecting the two Scale key frames added in Step 8, right click, and in the pop-out menu navigate to "Keyframe Assistant" and select "Exponential Scale," as seen below.

Step 10. It is time to blend the layers together. With Layer #2 selected, navigate to the "Ellipse Tool" and add an elliptical mask. Then, double-click the letter "M" so that the new Mask menu appears below Layer #2. Change the Mask Feather to 250.00,250.00 pixels and the Mask Expansion to -250.0 pixels, as seen below.

Where to find the "Ellipse Tool"
Step 11. Repeat Step 10 for each layer. Adjust each elliptical mask as needed.
Step 12. Create the rotation effect by navigating to "Layer>New>Null Object." Parent Layer #1 to the new Null Object (which can be renamed to "Rotation"). Adjust the rotation to 0x+180.0˚ and add a key frame. Move forward to the end, adjust the rotation to 0x+0.0˚, and set another key frame (Note: this way, the image will rotate right side up, instead of upside down). Lastly, select both Rotation key frames and click the "F9" key to make the rotation more smooth.
Step 13. Add some stars to the Earth shot by navigate to "Layer>New>Solid." Then Navigate to "Effect>Noise&Grain>Fractal Noise." Bring the Transform scale down, increase contrast, and lower the brightness (Note: Adjust to personal preference). Move the new solid layer below the last layer and parent it to Layer #1, so that everything is connected.
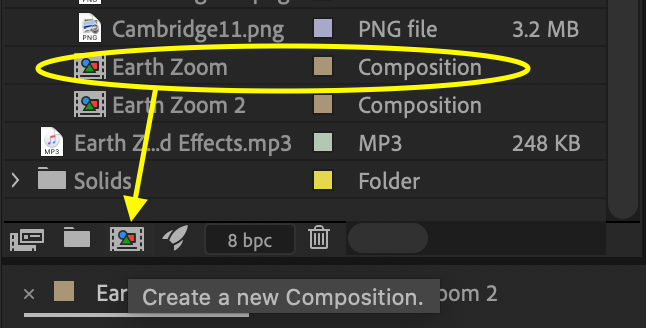
Step 14. Add a camera shake by taking the Composition you are working on from the "Project" left-hand side menu and duplicate it by dragging it to the "Create a new Composition button, as seen below. While on the new Composition timeline, navigate to "Effect>Expression Controls>Slider Control." Click the letter "P" to bring up the Position. Then, while holding the "Alt/Option" key, click the stopwatch next to Position to bring up the expression view and write wiggle(10,effect("Slider Control")("Slider")), as seen below (Note: the 10 indicates that it will wiggle 10x/second per pixel). Then, click the letter "U" to bring up the Slider Control and set the key frames: 1) set to 0; 2) set to 10; 3) set to 10; 4) set to 0 (Note: Between key frames 1 and 2 the wiggle begins, between frames 2-3 the wiggle will be set to 10, and between frames 3-4 the wiggle will come to a stop).

Drag your working Comp to the indicated icon to create a new Comp

Writing the expression to create the wiggle effect
Step 15. Adjust the camera fringe occurring from the wiggle by navigating to the "Effect & Presets" right-hand menu and searching for "Motion Tile" (Note: this allows you to extend the edges). Drag "Motion Tile" onto the timeline and in the menu that appears on the left-hand side select "Mirror Edges" and adjust the "Output Width" and "Output Height" to 120.0.
Step 16. Adjust the abrupt start and ending by right-clicking on the layer and navigate to "Time>Enable Time Remapping." Set two keyframes, one where it starts and one where it ends. Select the two keyframes and click "F9".
Step 17. Add any desires sound effects.
Step 18. Export the Comp, open the file in Premiere, and drag the clip onto the timeline.
Step 19. To create the reverse effect, duplicate the clip and add it to the timeline. Then, right-click the duplicated clip and select "Speed/Duration." In the menu that opens, check the box next to "Reverse Speed" and the "OK." Adjust the length of the two clips as desired.
Step 20. Export and share your video!
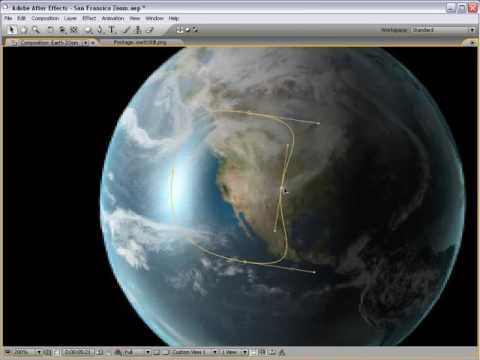
The instructions above follow this tutorial (Note: the guide includes screenshots of the updated Ae interface, not the one shown in the video):


