SCALAR SUPPORT
Scalar is a Havard-supported web publishing tool that allows you to create rich, long-form scholarly content on the web.
This guide was created for students in SOCIOL1130: Higher Ed, Scholarship and Service with material provided by:
- Manja Klemenčič, Lecturer on Sociology
- Cole Crawford, Humanities Research Computing Specialist
- Nicolette Bardele, PhD student in Sociology
Scroll through each section to learn more:
- Creating Chapters and Pages
- Defining Layouts and Paths
- Importing and Annotating Media
- Adding Text and Media to Your Scalar Page
1. Creating Chapters and Pages
Your contribution to our collaborative digital book in Scalar will be comprised of four parts:
- Introductory page (This will be featured in the Scalar book’s table of contents and will simply include your name, organization/group/role, and media (photo(s), in this case)).
- Story of Self page
- Story of Us Page
- Blueprint for Action page
Steps:
- Create a Scalar page using the plus button from within the book, or under
Pages>Create New Pagefrom the Dashboard. - Add a title (should include both your name and the name of your organization/group) and brief description.
- Your first page is the introductory page, so you will eventually want to include media to visually introduce your work. Under the
Layouttab in the editor toward the bottom of your screen, choose a new layout in the dropdown, such as Image Header, Splash, or Visual Path. You can try experimenting with the Interactive or Visualization layouts as well if it makes sense for your project. (See the Page Layouts section for more information about each layout.)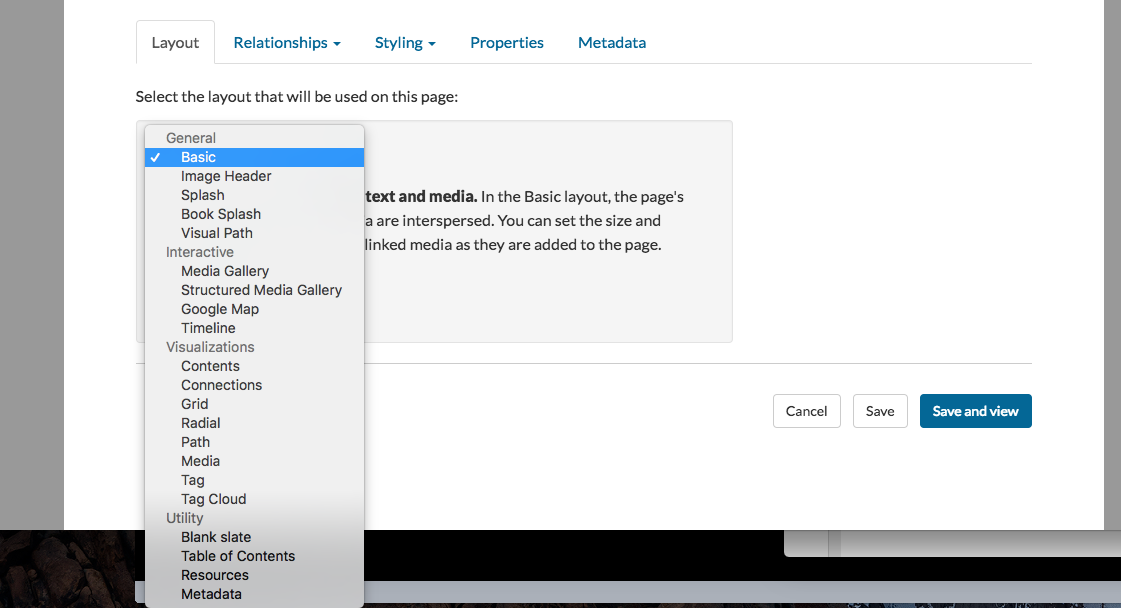 a. If you select a layout that includes a key image, you will need to upload one. (See the Importing Media section for more info.) When you have a key image you would like to add, go to
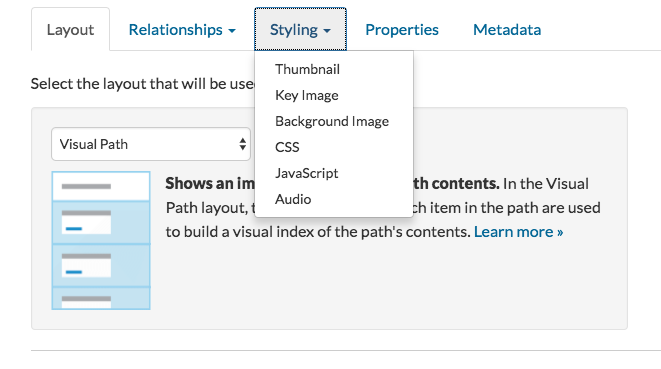
 Styling>Key Image. This will be a full-screen, featured image for this page. If you use the Visual Path layout, you will need to choose Key Images for all of your other pages.
- Under the
Relationshipstab, choose Path and clickChoose the items that it contains.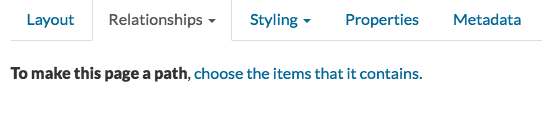 a. For now, since you have not created your other two pages yet, you can create stubs here by clicking
 Create page on-the-fly(in the bottom left corner of your screen) and filling in the basic info for the page (at least a title). Then clickSave and link. b. After you’ve created one stub, clickAdd more contentand create your second stub page using the same method as in (a.)—these two stubs will ultimately become your two pages that make up your chapter. - Be sure to save your page!
2. Defining Layouts and Paths
Page Layouts
Scalar offers a rather lengthy list of possible layouts to use in developing your page (these are listed under the Layout tab once you’ve opened the editing window for a page). For the purposes of the sorts of projects you are working on for this class, the following layouts, which are all in the “General” section of this list, are the most useful:
- Basic - this is the one we’ve worked with the most in section this semester and is generally the one you’ll want to use for the body of your pages.
- Image Header - this is a slightly different alternative to Basic; the one additional thing worth noting here is that, in order to select the image you’d like displayed at the top of your page, you need to also go under
Stylingand thenKey Image, at which point you’ll select your image from the list there. - Splash - this one is great for your intro page—it simply displays a full-screen photo that introduces your project. Similarly to above, you’ll need to select a
Key ImageunderStyling. - Visual Path - this one is also a great option for your intro page—it generally functions as a table of contents of sorts and shows a series of photos for each of the pages you’ve linked to it as paths (more on paths later). In order to get a
Key Imagefor each page, you’ll need to add those to each of the respective pages you’ve created otherwise—essentially, you don’t do that in the editing window for your Visual Path page but instead add these images when you’re editing each of your other pages.
Additional note about Styling:
If you’d like to add an image to the background surrounding the text of your page (basically just in the margins outside of the white space where the body of your page is), you can do so under Styling > Background Image.
Paths
Paths essentially link one page to the next. To create a new path, first make your pages (see the section on Creating Your Chapter & Pages). Then, go to the editing window for the page you’d like the others to stem from—generally, your intro page. Click on the Relationships tab toward the bottom and select Path. Then, click Choose the items that it contains. A list of all of the pages in the book will pop up, and you should check off the ones that you would like to connect—then click Add Selected and Save and View.
3. Importing and Annotating Media
Before you can add media to your page, you will have to upload it to Scalar.
Importing Media
To import media (either from existing archives or from your own files), click on the Import Menu (the icon is an arrow pointing down into a box, in the top right corner of the screen to the right of the pencil/edit icon).
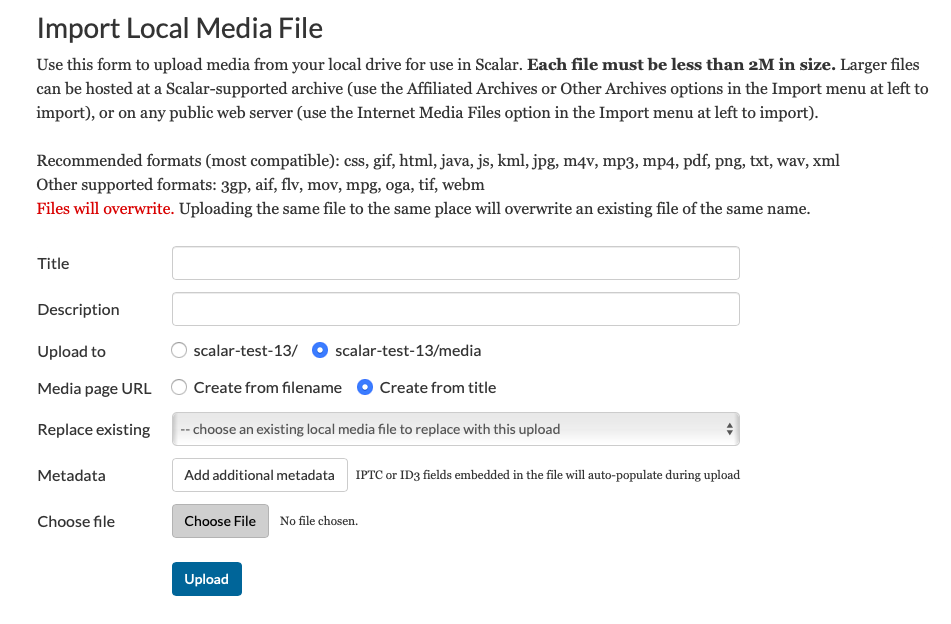
Uploading media from your files
Click the Import Menu icon and go down to Files and URLs > Upload Media Files. A window (screenshot below) in which you can enter the title and description of your media should pop up—you should typically upload the media to the default “/media” location. This helps to make sure that media file names don’t collide with page names in the rest of the book.
Note: Each file must be no larger than ~10MB. The screenshot below also indicates which formats of files are supported by Scalar.
Link to media on the web
If there are media from another online source/that are hosted on the web that you would like to import, you can do so via Files and URLs > Link to Media Files. A window in which you can add the media file URL will then pop up.
Recommendations for including media larger than 10MB
If the media (images, videos, audio, etc.) you would like to include are larger than 2MB, you won’t be able to import them directly to the Scalar book. Rather, you may need to upload the media to a different platform first and embed the URL from that external source into your Scalar page.
| Media Type | Recommended Hosting Platform |
|---|---|
| Images | Flickr or Google Photos* |
| Videos | Vimeo or YouTube |
| Audio | SoundCloud |
*Google Photos is generally a really good option, but it is not always the easiest to get the “hard links” that Scalar needs. This article describes one way to do it using https://ctrlq.org/google/photos/.
Annotating Media
You can add annotations to various media types, including images, audio files, and videos.
Annotating images
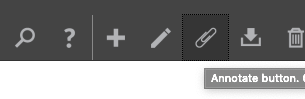
To annotate an image, first navigate to the image file in Scalar by clicking on
Table of Contents>Index>Mediathen click on the link to the media. (This assumes that you have imported the image into Scalar but have not yet added it to your page.)Click on the annotation icon (the paperclip) in the toolbar, and this will open the annotation editor.
Then, click and drag your cursor across the image—drawing a rectangle around the area within the picture that you want to annotate. Type in the title of the annotation in the field below the rectangle and click
Save.In the annotation editor below the image, you’ll then see the title you’ve entered and the coordinates of where the annotation is in the image. Here, you can make edits (but it’s often not necessary), including adding a few sentences in the content box.
You can add multiple annotations to a single image, and these will show up in the left column in the annotation editor. When you’re finished, click
Done.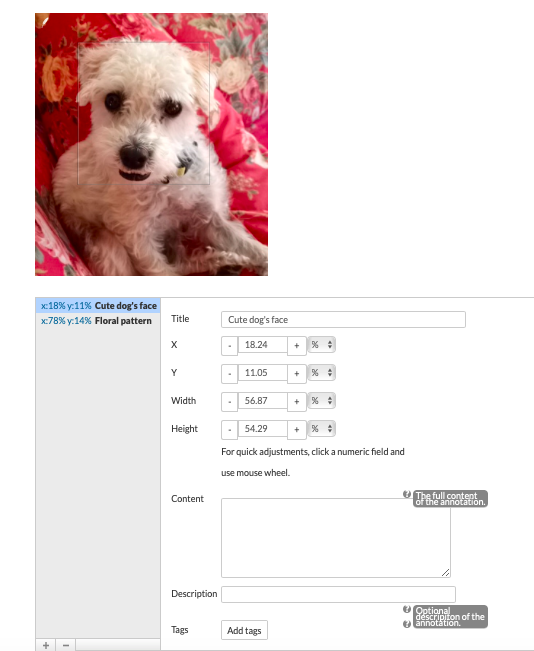
When you later add the image into your page, you’ll need to select which annotations you want to be displayed and also choose an annotation to be highlighted when the page first loads (or you can set this as “none”).
Annotating audio and video
To annotate an audio or video file, first navigate to the file in Scalar by clicking on
Table of Contents>Index>Mediathen click on the link to the media. (This assumes that you have imported the file into Scalar but have not yet added it to your page.)Click on the annotation icon (the paperclip) in the toolbar, and this will open the annotation editor.
Then, navigate to the point in the audio or video file that you want to annotate first. Click the plus button the left to create a new annotation, which will be created at the current playback position of the file. Type in the title of the annotation, and use the green
Setbuttons to set the start and stop points of the annotation you’ve created—if you’ve already navigated to the right start point to begin with, that should be done, but then navigate again to the end point you’d like within the audio or video file and clickSetas needed.If you want to add additional information—maybe a few sentences describing that point in the audio or video file—you can do so using the content box in the annotation editor. Then, click
Save.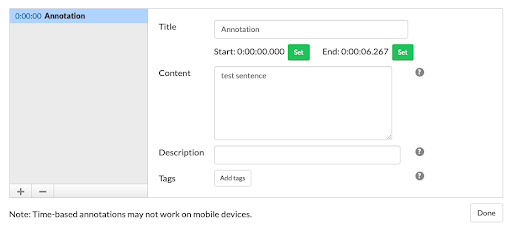
You can add multiple annotations to a single file, and these will show up in the left column in the annotation editor. When you’re finished, click
Done.When you later add the audio or video into your page, you’ll need to select which annotations you want to be displayed and also choose an annotation to be highlighted when the page first loads (or you can set this as “none”).
4. Adding Text and Media to Your Scalar Page
Text
Adding text to a page
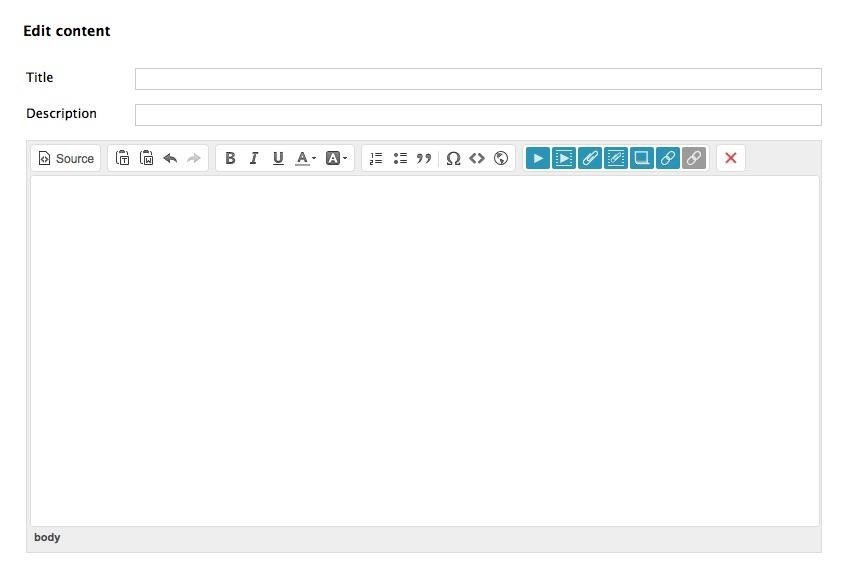
To edit your page, click on the pencil icon in the top right corner—the following window should come up. You can enter the main text content of your page here.
Note: Sometimes simply pasting text from Word into Scalar can cause formatting/styling issues. One way to address this is to select the text you want to fix and click the Tx button, which will delete any links and formatting from the selected text.
Text formatting tips
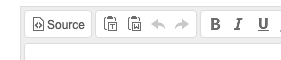
Pasting styled text from a different program (like Word, for example) into Scalar can be finicky and have unpredictable results. The best way to avoid this is to copy the text as usual and then, when you get to the Scalar editing window for your page, click on the Paste as plain text button in the toolbar (it is just to the right of the Source button). Alternatively, you could try the Paste from Word button—the second clipboard—which attempts to strip out any irrelevant formatting while still preserving existing styling from Word, but just be aware that this can still be somewhat unpredictable.
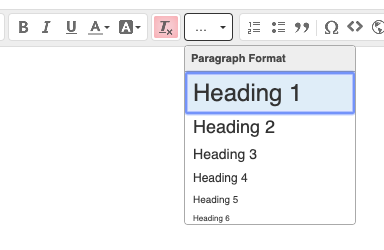
If you want to change the size of any subheadings you want to include within the body of your page, you can do so using the Paragraph Format option—this is worth playing around with a bit so that you can see exactly how things will lay out on your specific page. This button is the … button to the right of the red button in the toolbar.
Media
Note: In order to add media to your Scalar page you will first have to upload it. See the section on Importing Media for more instructions on how to do that.
Adding inline media to a page
- Within the body of your page, click on the point at which you want to embed your media. Then, click on the second blue box in the toolbar (
Insert Inline Scalar Media Link). Your media choices (things that have been imported already) will pop up—select the one you would like to include. - A “Media formatting options” window will come up. You can use this to format your media on your page—change the size, alignment, etc. Then, click
Continue, and this will bring you back to your page editing window. - Be sure to save often!
To change the formatting of media you have already embedded in a page
- Within the editing window, roll over the image/video/etc. you want to edit—click on the gear that pops up in the top right corner. This will bring you back to the “Media formatting options” window from earlier, and you can make your adjustments as necessary.
- If you encounter a video that is centered on the page but has some gray margins to the left and right of it, this is likely because you have its size set as “full.” Changing it to “native” will address this issue while still keeping the video centered on your page.
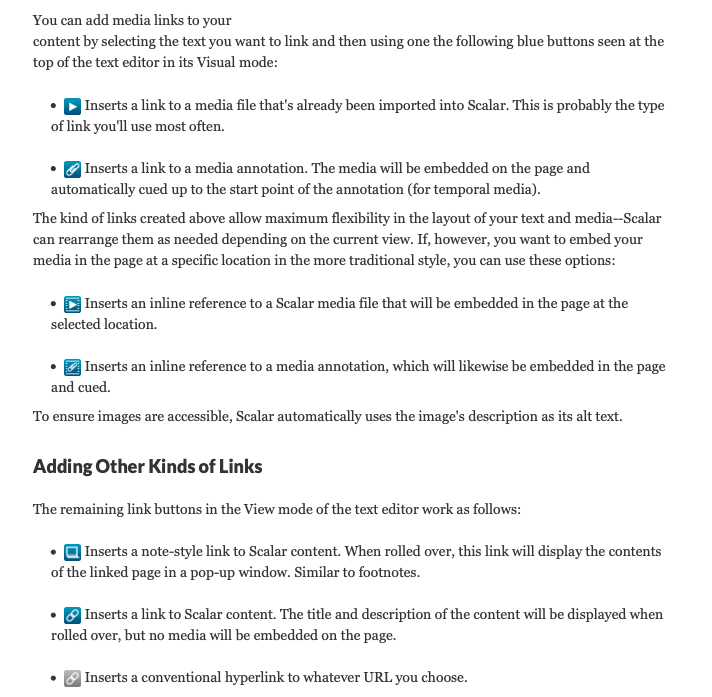
For more information on what each of the blue media-related buttons do, see the excerpt from the Scalar 2 User’s Guide below: